Bake the Ultimate Scallion Chive Bread with Garlic and Rosemary: A Flavorful Homemade Delight

There’s nothing quite like the comforting aroma and satisfying taste of freshly baked bread filling your home. While summer heat often deters me from firing up the oven, a strong craving for a warm, savory loaf recently became an irresistible mission. I set out to find a bread recipe that promised both deliciousness and a creative twist. Little did I know, this quest would lead to the creation of a truly exceptional **scallion chive bread with garlic and rosemary** that has quickly become a household favorite.
This particular baking adventure was sparked by my participation in a delightful culinary community known as The Secret Recipe Club. For those unfamiliar, it’s a fantastic initiative where food bloggers are secretly assigned another participant’s blog. The challenge is to explore their blog, choose a recipe that inspires you, recreate it, and then share your experience on a designated “reveal day.” It’s a wonderful way to discover new blogs, experiment with different cuisines, and connect with fellow food enthusiasts. The excitement of the reveal day, where everyone simultaneously shares their secret creations, adds an extra layer of fun to the entire process.

My assignment for this round was Tangerine’s Kitchen, a blog beautifully curated by Rachel, who hails from India. While her blog doesn’t reveal too much personal detail, her passion for cooking and baking shines through every post. Browsing through her diverse collection of recipes was a joy, and I found myself bookmarking several potential candidates. Ultimately, I was drawn to her intriguing Cilantro, Scallions and Garlic Bread recipe. It sounded wonderfully aromatic and perfectly aligned with my craving for a savory, herb-infused loaf.
Upon reviewing Rachel’s original recipe, I identified a few opportunities to enhance the texture and flavor of the bread to suit my personal preference for a softer crumb and a beautifully golden crust. Her recipe called for only water in the dough, which certainly works, but adding a touch of fat can make a significant difference. Incorporating a fat like oil or melted butter helps to tenderize the dough, leading to a more supple loaf and contributing to that desirable rich brown crust. For this adaptation, I opted for olive oil, appreciating the bold, slightly fruity flavor it imparts to baked goods. However, melted butter or a neutral oil like canola would also work splendidly, offering their own unique subtle notes.
Beyond the fat, another key modification was the liquid component. While water is a standard base for many bread recipes, substituting some of it with milk can elevate the bread considerably. Milk enriches the dough, resulting in a finer, softer crumb and a much more tender crust. The proteins and sugars in milk contribute to a richer flavor and a more consistent browning. By combining milk with water, I aimed for a balance of hydration and richness that would yield a truly superior loaf.
My final adaptation concerned the herbs. Rachel’s recipe featured cilantro, which I love, but I decided to pivot based on what I had on hand and what I felt would create an even more robust and aromatic profile. I chose a combination of fresh chives and minced rosemary. Chives offer a delicate oniony flavor, while rosemary provides a wonderfully pungent, pine-like aroma that pairs exceptionally well with garlic. This substitution proved to be a fantastic choice, creating a flavorful **garlic rosemary bread** that was both familiar and exciting. If you prefer a milder bread, you could certainly experiment with other herbs like thyme, or even incorporate a mix of milder options.
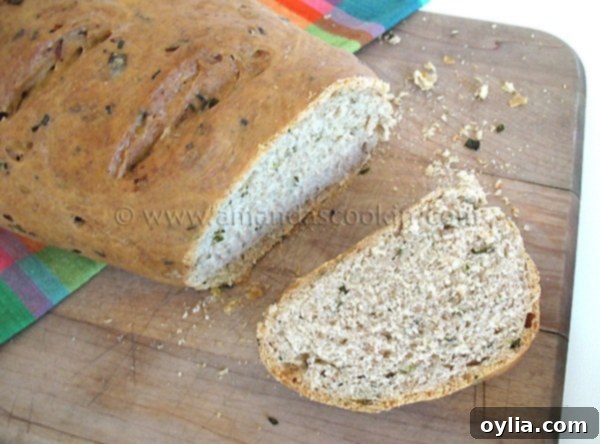
One practical challenge with the original recipe was the baking time, as it simply stated “bake until done.” For bread, precise baking is crucial. To ensure a perfect loaf, it’s always a good idea to use an instant-read thermometer. Inserting it into the center of the bread will give you an accurate reading. While opinions vary slightly, a range between 185°F (85°C) and 200°F (93°C) typically indicates a fully cooked and delicious loaf. My loaf reached perfection at 43 minutes, achieving a beautiful golden-brown crust and a thoroughly cooked interior. The combination of bold rosemary and rich olive oil truly shone through, creating a robust flavor profile that was incredibly satisfying. If you prefer a more subtle flavor, a milder herb such as thyme and a neutral oil like canola oil would make for a delightful alternative.
This **homemade bread recipe** is not just about the final product, but the entire process – from the bubbling yeast to the gentle kneading, and finally, the intoxicating aroma that fills your kitchen. It’s a rewarding experience that yields a versatile loaf, perfect for serving alongside soups, stews, or simply enjoyed with a pat of butter. The combination of fresh scallions, chives, garlic, and rosemary creates a symphony of flavors that will impress anyone lucky enough to try a slice. This bread is hearty enough to stand on its own, but also complements a wide range of dishes, from a simple pasta to a full roasted chicken. The slight sweetness from the honey balances the savory herbs beautifully, making each bite an absolute delight.
Whether you’re an experienced baker or new to the world of bread making, this recipe for **scallion chive bread with garlic and rosemary** is approachable and incredibly rewarding. Following these steps, paying attention to the dough’s consistency, and ensuring proper rising times will set you up for success. Don’t be afraid to adjust the herbs to your taste – perhaps a sprinkle of Parmesan cheese folded into the dough for an extra savory kick, or even some sun-dried tomatoes for a Mediterranean twist. The beauty of homemade bread lies in its adaptability and the personal touch you can add.

Scallion Chive Bread with Garlic and Rosemary
IMPORTANT – There are often Frequently Asked Questions within the blog post that you may find helpful. Simply scroll back up to read them!
Print It
Pin It
Rate It
Save ItSaved!
Ingredients
- 2 ½ cups bread flour
- 1 ½ cups whole wheat flour
- 1 teaspoon salt
- 1 tablespoon SAF instant yeast
- 2 tablespoons honey
- ¼ cup lukewarm milk
- 1 ¼ cups room temperature water
- 3 tablespoons olive oil
- ¼ cup chopped fresh chives
- 1 teaspoon minced fresh rosemary
- 2 scallions chopped
- 4 cloves garlic chopped
- Fresh ground pepper to taste
- 1 tablespoon unsalted butter
Instructions
-
Dissolve the yeast and honey in the warm water. Allow it to froth for about 10-15 minutes.
-
Meanwhile, whisk the flours together with the salt. Make a well in the center of the dry ingredients and add the yeast mixture, the olive oil, and the water. Using a dough hook combine the ingredients until a soft dough is formed. Dough might be a little sticky to the touch.
-
Lightly dust counter and your hands with flour. Knead the dough for about 5 minutes. Place dough into a greased bowl. Cover with a towel and let rise until doubled, about an hour.
-
Combine garlic, scallions, chives, rosemary, and about 5 or 6 turns of freshly ground black pepper in a small bowl.
-
Punch the risen dough down and add in herb mixture. Knead all the ingredients together well. Cover and allow to rise again until doubled, about an hour.
-
Preheat your oven to 400 F. Punch down dough and press into a rectangle, about 14″ x 6″. Roll the rectangle up and pinch the seam together. Place loaf onto insulated baking sheet, seam side down. Use a sharp knife to cut several 1/4″ deep slits diagonally into loaf. Bake in preheated oven for 40-45 minutes (mine was 43).
-
Remove from oven and let cool on a wire rack.
Nutrition
The recipes on this blog are tested with a conventional gas oven and gas stovetop. It’s important to note that some ovens, especially as they age, can cook and bake inconsistently. Using an inexpensive oven thermometer can assure you that your oven is truly heating to the proper temperature. If you use a toaster oven or countertop oven, please keep in mind that they may not distribute heat the same as a conventional full sized oven and you may need to adjust your cooking/baking times. In the case of recipes made with a pressure cooker, air fryer, slow cooker, or other appliance, a link to the appliances we use is listed within each respective recipe. For baking recipes where measurements are given by weight, please note that results may not be the same if cups are used instead, and we can’t guarantee success with that method.
