Easy Peppermint Candy Cane Bark: The Ultimate No-Bake Holiday Treat & Gift Guide
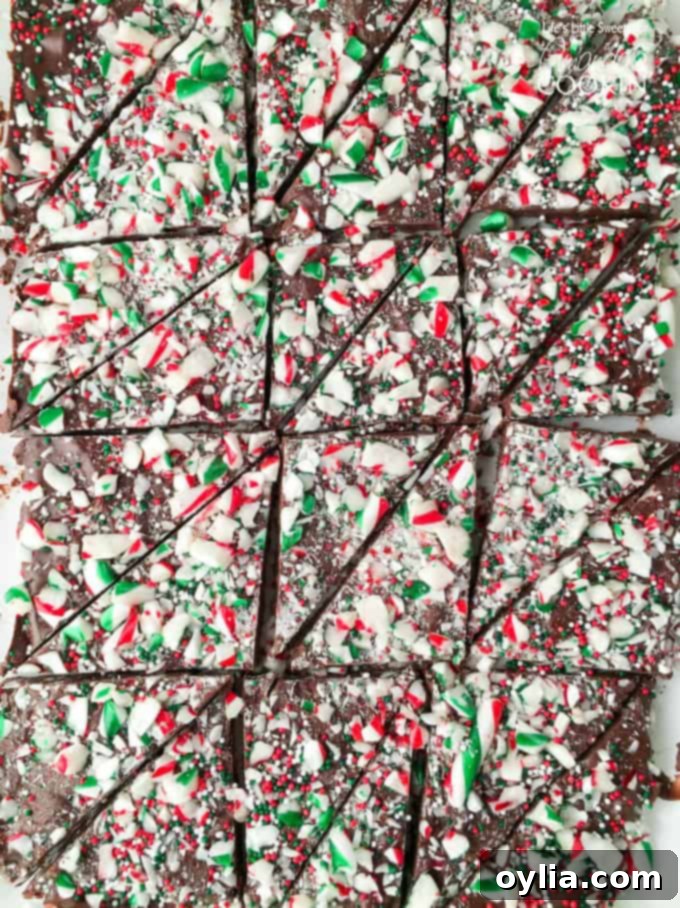
Get ready to create some holiday magic with this incredibly simple and refreshingly sweet **Peppermint Candy Cane Bark** recipe! This delightful **no-bake candy treat** takes mere minutes to prepare, making it an absolute lifesaver during the busy festive season. Whether you’re looking for the perfect **holiday stocking stuffer**, a charming homemade gift to package in jars, or just a delicious treat to enjoy yourself, this **easy peppermint bark** ticks all the boxes. Its vibrant colors and irresistible flavor embody the spirit of Christmas, promising to be a festive favorite.

Why You’ll Love This Peppermint Candy Cane Bark
This **Peppermint Candy Cane Bark** offers a sensational textural experience, combining the satisfying crunch of crushed peppermint candy canes with the smooth, melt-in-your-mouth richness of peppermint-infused chocolate. Imagine enjoying triangles of this delectable treat alongside a steaming mug of hot coffee, or for an extra special indulgence, dissolving a small piece directly into your **hot chocolate** for an instant peppermint mocha twist!
Beyond its delicious taste, the sheer simplicity of this recipe is what makes it truly shine. Whipping up these lovely, sugary shards takes mere minutes, establishing it as the perfect easy, last-minute treat for any occasion. The vibrant white, green, and red hues of the candy canes pop beautifully against the chocolate, transforming this simple **peppermint chocolate bark** into a stunning, yet effortless, centerpiece on any dessert table. It’s a festive delight we cherish just as much as our Saltine Toffee!
A Crowd-Pleasing Holiday Classic
When I first tested this recipe, I shared photos on my Snapchat and Instagram, and the response was immediate! Relatives and friends were clamoring for me to save some for them. I have no doubt that your loved ones will react similarly, eagerly asking for a bite when you bring this pretty and festive **homemade peppermint bark** along to your next holiday gathering. It’s a surefire hit that brings smiles and festive cheer.
Related Recipe – Candied Pecans

The Versatility of Chocolate Bark Recipes
I absolutely adore **chocolate bark** recipes because they are incredibly versatile and easy to customize for any season or celebration. From spooky Halloween themes to vibrant spring variations, the possibilities are endless once you master this basic technique. For this particular **candy cane bark recipe**, it’s especially fantastic if you find yourself with an abundance of **candy canes** after the holiday season. It’s a wonderful and delicious way to use up those extra festive treats instead of letting them go to waste.
There are affiliate links in this post. That means if you buy something from that link, I will earn a small commission, but it won’t cost you anything additional.

Ingredients for Peppermint Candy Cane Bark
This **peppermint candy cane bark** stands out for its simplicity, requiring minimal ingredients to create maximum flavor and festive appeal. Here’s what you’ll need:
- **24 ounces of sweetened dark chocolate morsels:** While dark chocolate provides a rich, intense flavor that beautifully complements the peppermint, you can easily substitute with semi-sweet or milk chocolate morsels based on your preference. High-quality chocolate will yield the best results for smoothness and shine.
- **6 ounces (approximately 12 candy canes, 170 grams) crushed peppermint candy canes:** The star of the show! Crushing them yourself ensures fresh, vibrant peppermint flavor and that signature crunchy texture.
- **⅛ teaspoon peppermint extract, more if desired but keep in mind a little goes a long way *optional*:** This enhances the peppermint flavor in the chocolate. Use sparingly, as too much can make the chocolate seize or become overly strong. You can omit it if your candy canes provide enough flavor.
- **2 teaspoons holiday-theme nonpareils or sprinkles *optional*:** For an extra touch of festive sparkle and visual appeal. Choose red, green, or white sprinkles to amplify the holiday theme.

Essential Kitchen Tools for Peppermint Candy Cane Bark
Preparing this **easy peppermint candy cane bark** requires only a few basic kitchen tools, most of which you likely already own. Having the right tools ensures a smooth and enjoyable process:
- **13″ x 9″ inch shallow-rimmed pan (like a brownie pan) or cookie sheet:** This provides the surface for spreading your chocolate. A rimmed pan prevents the chocolate from running off.
- **Parchment paper:** Absolutely essential for easy cleanup and seamless removal of the hardened bark from the pan. Do not skip this!
- **Offset spatula or baking spatula:** Ideal for smoothly and evenly spreading the melted chocolate across your prepared baking sheet.
- **Cutting board (13″ x 9″ inches or larger):** Provides a stable surface for cutting the hardened bark.
- **Measuring spoons:** For precise measurements of peppermint extract and sprinkles.
- **Sharp knife for cutting the chocolate:** A good, sharp knife will help create clean breaks and prevent the chocolate from shattering unevenly.

Making Your Peppermint Candy Cane Bark: A Simple No-Bake Delight
This **Peppermint Candy Cane Bark** truly only has four ingredients, two of which are optional, making it an incredibly easy, no-fuss, and **no-bake recipe**—perfect for the often-hectic holiday season. This minimal ingredient list means less shopping, less prep, and more time enjoying the festivities. It’s akin to other simple delights like these amazing-looking peppermint topped fudge brownies; they both look so good and are equally straightforward!

Tips for Perfect Peppermint Bark Every Time
- **Melting Chocolate Safely:** When melting chocolate in the microwave, heat it in short 30-second bursts, stirring thoroughly after each interval. Chocolate retains its shape even when melted, so stirring is crucial to prevent burning. If you prefer, a double boiler method also works wonderfully, providing gentle, even heat. Avoid getting any water into the chocolate, as this can cause it to seize.
- **Crushing Candy Canes:** For perfectly crushed candy canes, place them in a Ziploc bag and gently smash them with a rolling pin or the bottom of a heavy pan. Aim for a mix of fine dust and small, chunky pieces for the best texture and visual appeal.
- **Even Spreading:** Once melted, work quickly to spread the chocolate evenly across your parchment-lined baking sheet. An offset spatula makes this task much easier, ensuring a consistent thickness for your bark.
- **Timing is Key for Toppings:** Sprinkle the crushed candy canes and optional sprinkles immediately after spreading the chocolate. The warmth of the chocolate will help the toppings adhere as it begins to set.
- **Cooling for Crispness:** Allowing the bark to cool completely is essential for a clean break. If you’re in a hurry, refrigerating it for 10-15 minutes will speed up the setting process.
- **Cutting into Pieces:** Once fully hardened, transfer the bark (still on the parchment paper) to a cutting board. Use a sharp knife to cut or gently break it into irregular pieces of your desired size. The irregular shapes are part of the charm of homemade bark!
Storage and Gifting Your Homemade Bark
This **peppermint candy cane bark** stores beautifully, making it an ideal candidate for holiday gifts and make-ahead treats. Store the bark in an airtight container at room temperature for up to 2 weeks, or in the refrigerator for up to 3-4 weeks. If storing in layers, place parchment paper between each layer to prevent sticking.
For gifting, consider packaging pieces of bark in clear cellophane bags tied with festive ribbons, small decorative tins, or elegant glass jars. Add a handwritten tag with ingredients for those with dietary concerns, and a sweet message. It’s a thoughtful and delicious **edible Christmas gift** that everyone will appreciate.
Frequently Asked Questions (FAQ)
- How long does peppermint bark last?
- When stored properly in an airtight container at room temperature, peppermint bark can last for up to 2 weeks. In the refrigerator, it can extend its freshness to 3-4 weeks. Freezing is also an option for even longer storage, up to 3 months.
- Can I use other types of chocolate?
- Absolutely! While dark chocolate is suggested for its rich flavor, you can easily substitute with semi-sweet, milk chocolate, or even white chocolate. White chocolate bark with peppermint is a classic variation. For a fun twist, try layering different types of chocolate!
- What if my chocolate seizes?
- Chocolate seizes when it comes into contact with even a tiny amount of water, causing it to become thick, lumpy, and unusable. To prevent this, ensure all your tools are completely dry. If it happens, you can sometimes rescue it by stirring in a teaspoon of vegetable oil or melted butter, but it may not be as smooth as intended.
- How do I crush candy canes easily?
- The easiest method is to place them in a sturdy freezer bag (like a Ziploc bag) and gently smash them with a rolling pin, the flat side of a meat mallet, or even the bottom of a heavy pan. Be careful not to apply too much force initially to avoid tearing the bag. Aim for a mix of fine powder and small crunchy bits.
- Can I make this peppermint bark year-round?
- Of course! While **peppermint candy cane bark** is a holiday staple, its refreshing flavor can be enjoyed anytime. Simply adjust your sprinkles (or omit them) to suit the occasion. It’s a fantastic treat for any peppermint lover!
Conclusion: Share the Festive Joy!
With everyone’s busy schedules and extra events and gatherings on the calendar, recipes should be as easy and enjoyable as this **Peppermint Candy Cane Bark**. It’s a delicious way to bring homemade warmth and holiday cheer into your home and share it with those you love. I hope you enjoy making and sharing this delightful **Christmas candy recipe** and have a truly wonderful holiday season!
More Candy Recipes
- Saltine Toffee
- Candied Pecans
- Peanut Butter Cups
- Homemade Peanut Brittle
- Chocolate Peanut Butter Balls
- Peppermint Candy Cane Bark
- Chocolate Peanut Butter Fudge
- Potato Candy

Peppermint Candy Cane Bark
IMPORTANT – There are often Frequently Asked Questions within the blog post that you may find helpful. Simply scroll back up to read them!
Print It
Pin It
Rate It
Save ItSaved!
Ingredients
- 24 ounces of sweetened dark chocolate morsels can substitute semi-sweet or milk chocolate morsels
- 6 ounces 12 candy canes, 170 grams crushed peppermint candy canes
- ⅛ teaspoon peppermint extract more if desired but keep in mind a little goes a long way *optional
- 2 teaspoons holiday-theme nonpareils or sprinkles *optional
Before You Begin
Instructions
-
Line a baking sheet with parchment paper.
-
Heat chocolate morsels in a microwave safe bowl at 30 second intervals until melted, stirring in between. Stir in peppermint extract to the melted chocolate.
-
Spread melted chocolate into a 13″ x 9″ rectangle. Sprinkle crushed candy canes and nonpareils or sprinkles over the top. (Note: You can spread 1/2 the chocolate and sprinkle with half the toppings, then spread the remaining chocolate and the remaining toppings as I did in the photos as well) Allow to cool completely. You can speed up the process by refrigerating for 10 minutes. Cut into desired size pieces. Package for gifts or serve and enjoy!
The recipes on this blog are tested with a conventional gas oven and gas stovetop. It’s important to note that some ovens, especially as they age, can cook and bake inconsistently. Using an inexpensive oven thermometer can assure you that your oven is truly heating to the proper temperature. If you use a toaster oven or countertop oven, please keep in mind that they may not distribute heat the same as a conventional full sized oven and you may need to adjust your cooking/baking times. In the case of recipes made with a pressure cooker, air fryer, slow cooker, or other appliance, a link to the appliances we use is listed within each respective recipe. For baking recipes where measurements are given by weight, please note that results may not be the same if cups are used instead, and we can’t guarantee success with that method.

