Ultimate Chocolate Peanut Butter Cake: A Decadent Triple-Layer Delight
Prepare your taste buds for an extraordinary experience, because today we’re diving into a dessert so profoundly rich and irresistibly delicious, it might just make you swoon. This isn’t just any cake; it’s *the* Sour Cream-Chocolate Cake, crowned with a dreamy Peanut Butter Frosting and elegantly finished with a glistening Chocolate-Peanut Butter Glaze. Inspired by a recipe that instantly captivated my senses on Smitten Kitchen, this creation is more than just a cake—it’s a celebration in every single bite.

When I first encountered this chocolate peanut butter cake, my culinary curiosity was instantly piqued. The combination of deep, moist chocolate cake with creamy, slightly salty peanut butter frosting promised an unforgettable flavor profile. And true to its word, this recipe delivers an incredibly rich, fantastically delectable dessert that you’ll want to keep all to yourself. Seriously, my neighbors barely got a taste of the mini versions, and the main cake? It vanished without a trace!
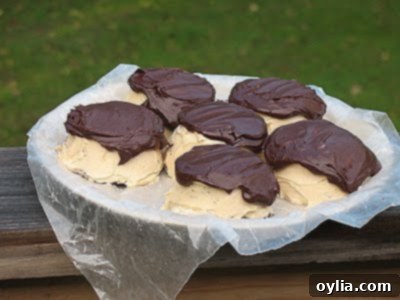
Speaking of mini cakes, this recipe is designed for a grand triple-layer presentation, calling for three 8-inch round cake pans. However, if you’re like me and only possess two, there’s a simple solution that yields delightful results: bake the remaining batter in a cupcake or muffin pan. These smaller portions, inverted and frosted with the same luscious peanut butter cream cheese frosting and chocolate glaze, make for perfect individual treats. They’re a wonderful way to share a bit of the magic without sacrificing the main event. These mini delights are equally amazing, offering the same intense flavors in a charming, bite-sized form.

Why This Chocolate Peanut Butter Cake is a Must-Try
This isn’t your everyday dessert. This chocolate peanut butter cake is undeniably best suited for a special occasion. Its decadent richness and stunning presentation make it an ideal centerpiece for birthdays, anniversaries, or any celebratory gathering where you want to truly impress your guests. Every element of this cake is crafted to perfection, promising a dessert experience that is both luxurious and comforting.
The Star of the Show: Moist Sour Cream Chocolate Cake
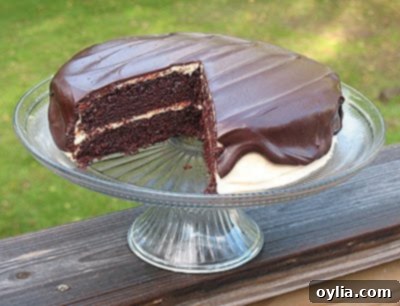
The foundation of this masterpiece is a sour cream chocolate cake that is simply unparalleled in its moisture and depth of flavor. The sour cream plays a crucial role, not only adding a subtle tang that beautifully balances the sweetness but also contributing to an incredibly tender crumb. This cake is so moist, in fact, that you’ll need to handle the layers with care. The deep chocolate flavor is pronounced yet not overpowering, creating the perfect canvas for the vibrant peanut butter frosting.
The Perfect Pairing: Creamy Peanut Butter Cream Cheese Frosting
What truly elevates this dessert is the peanut butter cream cheese frosting. It’s a revelation, reminiscent of the best apple dip you’ve ever tasted, but in a frosting form. The tanginess of cream cheese cuts through the richness of the peanut butter and sugar, creating a wonderfully balanced and incredibly smooth texture. This frosting is not just a topping; it’s an integral part of the flavor symphony, offering that perfect blend of sweet and salty that makes chocolate and peanut butter such an iconic duo.
The Finishing Touch: Silky Chocolate-Peanut Butter Glaze
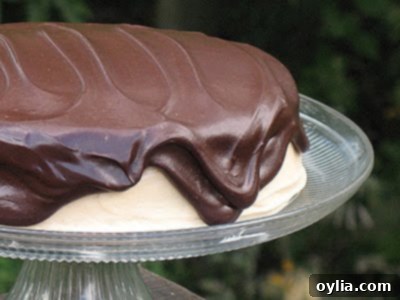
As if the cake and frosting weren’t enough, this recipe is completed with a glossy chocolate-peanut butter glaze that drips elegantly down the sides. This glaze adds another layer of chocolatey, peanut buttery goodness, creating a visual feast that is as enticing as its taste. The slight bitterness of semisweet chocolate combined with the nutty notes of peanut butter in a smooth, pourable consistency brings everything together in perfect harmony. The visual appeal of the long, luxurious drips against the pale frosting is simply breathtaking.
Expert Tips for Baking Your Chocolate Peanut Butter Cake
To ensure your cake turns out flawlessly, here are some crucial tips gleaned from experienced bakers:
- Handle with Care: As mentioned, the chocolate cake layers are exceptionally moist and delicate. To make them easier to handle, especially when layering and frosting, a pro tip is to firm them up in the freezer for about 30 minutes. They’ll defrost quickly once assembled, and you’ll be grateful for the added stability.
- The Crumb Coat Secret: For a professional-looking finish, especially with a dark cake and lighter frosting, apply a “crumb coat.” This is a thin layer of frosting that seals in any loose crumbs, preventing them from showing up in your final, smooth outer layer. After applying the crumb coat, chill the cake for 15-30 minutes until firm before adding the remaining frosting.
- Chilling for the Glaze: Once your cake is fully frosted, it helps to chill it again. A cooler, more set peanut butter frosting will provide a better surface for the chocolate-peanut butter glaze, resulting in those beautiful, distinct drips down the sides.
- Room Temperature Ingredients: For the frosting, ensure your cream cheese and butter are at proper room temperature. This will help them cream together smoothly without lumps, resulting in a light and fluffy frosting.
- Sifting is Key: Don’t skip sifting the confectioners’ sugar for the frosting. This prevents lumps and ensures a silky-smooth texture.

Chocolate Cake with Peanut Butter Frosting & Chocolate Peanut Butter Topping
IMPORTANT – There are often Frequently Asked Questions within the blog post that you may find helpful. Simply scroll back up to read them!
Print Recipe | Pin It | Rate It
Course: Desserts
Cuisine: American
Servings: 12 – 16
Author: Amanda Davis
Ingredients
For the Sour Cream-Chocolate Cake
- 2 cups all-purpose flour
- 2 ½ cups sugar
- ¾ cup unsweetened cocoa powder (preferably Dutch process)
- 2 teaspoons baking soda
- 1 teaspoon salt
- 1 cup neutral vegetable oil (such as canola, soybean or vegetable blend)
- 1 cup sour cream
- 1 ½ cups water
- 2 tablespoons distilled white vinegar
- 1 teaspoon vanilla extract
- 2 eggs
For the Peanut Butter Frosting
- 10 ounces cream cheese (at room temperature)
- 1 stick (4 ounces) unsalted butter (at room temperature)
- 5 cups confectioners’ sugar (sifted)
- ⅔ cup smooth peanut butter (preferably a commercial brand because oil doesn’t separate out)
For the Chocolate Peanut Butter Glaze
- 8 ounces semisweet chocolate (coarsely chopped)
- 3 tablespoons smooth peanut butter
- 2 tablespoons light corn syrup
- ½ cup half-and-half
Instructions
For the Sour Cream-Chocolate Cake
- Preheat the oven to 350 degrees F (175°C). Butter the bottoms and sides of three 8-inch round cake pans. Line the bottom of each pan with a round of parchment or waxed paper and butter the paper.
- In a large bowl, sift together the flour, sugar, cocoa powder, baking soda, and salt. Whisk these dry ingredients to ensure they are well combined. Add the oil and sour cream, then whisk again until fully blended. Gradually beat in the water. Stir in the distilled white vinegar and vanilla extract. Finally, whisk in the eggs and continue to beat until the batter is smooth and well blended. Scrape down the sides of the bowl to ensure all ingredients are incorporated. Divide the batter evenly among the 3 prepared cake pans.
- Bake for 30 to 35 minutes, or until a cake tester or wooden toothpick inserted into the center of a cake comes out almost clean. Allow the cakes to cool in their pans for about 20 minutes before attempting to remove them. Invert the cakes onto wire racks, carefully peel off the paper liners, and let them cool completely.
(Deb note: These cakes are very, very soft. For easier handling during assembly, I found it incredibly helpful to firm them up in the freezer for about 30 minutes. They will defrost quickly once assembled, and you’ll be glad you took this extra step, trust me.)
- To frost the cake, place one cooled cake layer, flat side up, on a cake stand or a large serving plate. Spread ⅔ cup of the prepared Peanut Butter Frosting evenly over the top of this layer. Repeat this process with the next cake layer. Place the final cake layer on top and then use the remaining frosting to generously frost the top and sides of the entire cake.
(Deb note 1: For a clean, professional finish, especially with a dark cake and light-colored frosting, applying a thin “crumb coat” of frosting is highly recommended. This initial thin layer helps to bind any loose cake crumbs to prevent them from appearing in your final outer frosting layer. Once you’ve applied the crumb coat, chill the cake for 15 to 30 minutes until firm. Then, use the remainder of the frosting to create a smooth, perfect final coating.)
(Deb note 2: Once the cake is fully frosted, it’s beneficial to chill it again to allow the frosting to set firm. The cooler and more set the peanut butter frosting is, the better and more distinct drip effect you’ll achieve from the Chocolate-Peanut Butter Glaze.)
- To decorate with the Chocolate–Peanut Butter Glaze, place the entire cake plate on a large baking sheet. This will catch any drips and make cleanup easier. Carefully pour the warm glaze over the very top of the chilled cake. Using an offset spatula, gently spread the glaze evenly over the top, pushing it just to the edges so that it naturally runs down the sides of the cake in long, beautiful drips. Refrigerate the cake, uncovered, for at least 30 minutes to allow both the glaze and the frosting to set completely. For the best serving experience, remove the cake from the refrigerator about 1 hour before you plan to serve it. Optionally, decorate the top with coarsely chopped peanut brittle for an added crunch and visual appeal.
For the Peanut Butter Frosting
- In a large bowl, using an electric mixer, beat the room temperature cream cheese and unsalted butter until the mixture is light and fluffy. This typically takes 2-3 minutes. Gradually add the sifted confectioners’ sugar, 1 cup at a time, mixing thoroughly after each addition. Be sure to scrape down the sides of the bowl often to ensure all ingredients are well combined. Continue to beat on medium speed until the frosting is light and exceptionally fluffy, which should take an additional 3 to 4 minutes.
- Add the smooth peanut butter to the bowl and beat until it is thoroughly blended into the frosting, creating a uniform, creamy consistency.
For the Chocolate Peanut Butter Glaze
- Prepare a double boiler by setting a heatproof bowl over a saucepan of simmering water (ensure the bottom of the bowl does not touch the water). Combine the coarsely chopped semisweet chocolate, smooth peanut butter, and light corn syrup in the bowl. Cook, whisking often, until the chocolate is completely melted and the mixture is smooth and glossy.
- Remove the bowl from the heat. Whisk in the half-and-half until the glaze is smooth and fully emulsified. Use the glaze while it is still warm and pourable for the best drip effect on the cake.
Tried this Recipe? Pin it for Later!
Follow on Pinterest @AmandasCookin or tag #AmandasCookin!
The recipes on this blog are meticulously tested using a conventional gas oven and gas stovetop. Please be aware that ovens, particularly older models, can sometimes heat and bake inconsistently. To ensure accuracy, using an inexpensive oven thermometer can confirm your oven is reaching and maintaining the correct temperature. If you opt for a toaster oven or countertop oven, remember that their heat distribution might differ from a full-sized conventional oven, potentially requiring adjustments to your cooking or baking times. For recipes prepared with appliances like a pressure cooker, air fryer, or slow cooker, a link to the specific appliances we use is typically provided within each recipe. In baking recipes where measurements are given by weight, it’s important to note that substituting volume (cups) for weight may yield different results, and we cannot guarantee success with such alternative methods.
NEW! Be sure to subscribe to my newsletter, Foodie in the Craftroom, to receive updates and tips from both Amanda’s Cookin’ and Crafts by Amanda! Visit https://amandascookin.com/p/subscribe-to-newsletter.html
