Adorable Bunny Butt Cupcakes: The Ultimate Easter & Spring Dessert Guide
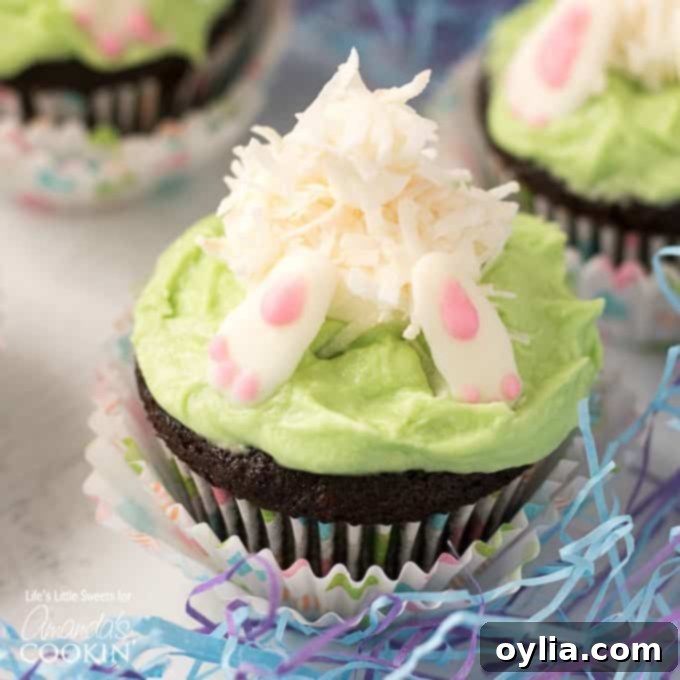
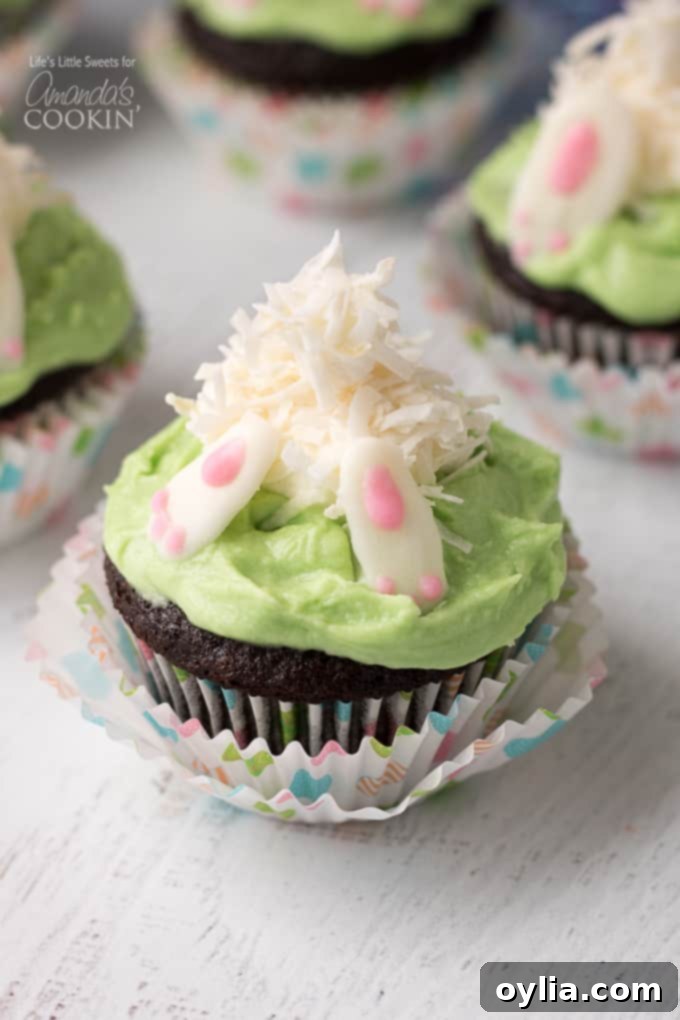
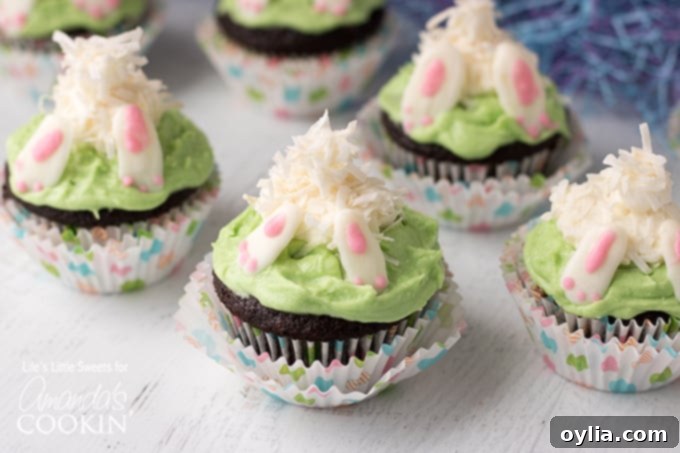
Get ready to hop into the most delightful baking adventure this season with these incredibly charming Bunny Butt Cupcakes! Perfect for Easter gatherings, springtime celebrations, or simply to add a touch of whimsy to your day, these cupcakes are not just visually adorable but also incredibly delicious. Imagine a moist, rich chocolate cupcake base, topped with vibrant green “grass” buttercream, and featuring a fluffy marshmallow bunny diving headfirst into its sweet burrow, complete with tiny white chocolate feet. This recipe is designed to bring smiles to faces of all ages and is surprisingly simple to create, even for novice bakers.
Whether you’re planning a festive Easter brunch, a joyful spring party, or looking for a fun kitchen project with the kids, these Bunny Butt Cupcakes are an absolute must-try. They offer a perfect blend of rich flavors and playful aesthetics, making them a centerpiece on any dessert table. Beyond their irresistible charm, we’ll guide you through every step, offering helpful tips and potential shortcuts to ensure your baking experience is as enjoyable and stress-free as possible.
If you’re already a fan of Easter desserts, you’ll love exploring this recipe and others like our delightful Easter Chick Cupcakes. But for now, let’s focus on these captivating little bunnies!
Why You’ll Adore These Bunny Butt Cupcakes
These aren’t just any cupcakes; they’re an experience! Here’s why these adorable Bunny Butt Cupcakes will become your new favorite Easter baking tradition:
- Unbeatable Cuteness: Let’s be honest, the sight of a tiny bunny diving into a patch of green grass is simply irresistible. They are guaranteed to draw “oohs” and “aahs” from everyone who sees them.
- Delicious Flavor: Beyond their charming appearance, these cupcakes boast a supremely moist chocolate base that pairs perfectly with the sweet, creamy green buttercream. The hint of coconut adds a lovely texture and flavor dimension.
- Perfect for Any Spring Occasion: While they shine brightest at Easter, these cupcakes are also ideal for spring birthdays, baby showers, garden parties, or any event where you want to add a touch of playful seasonal charm.
- Customizable and Flexible: Whether you’re a seasoned baker or prefer convenient shortcuts, this recipe can be adapted. Use a box mix for the cupcakes or store-bought frosting to save time, or make everything from scratch for a truly homemade touch.
- Fun to Make: Decorating these cupcakes is a fantastic activity, especially if you have little helpers in the kitchen. The assembly process is straightforward and provides a wonderful opportunity for creativity.
The Irresistible Concept: What Makes a Bunny Butt Cupcake?
The magic of these cupcakes lies in their clever design. Instead of a traditional bunny face, we focus on the delightful backside of a bunny playfully diving into the “earth.” This creative concept makes for an unexpected and utterly charming treat. Each cupcake represents a small patch of grass (green buttercream) where a curious bunny (marshmallow body and coconut flake “fur”) has burrowed, leaving only its fluffy tail (mini marshmallow) and tiny feet (white chocolate) visible. The dark chocolate cupcake base underneath perfectly mimics rich, dark soil, enhancing the realistic and whimsical garden scene.
This design is not only unique but also incredibly engaging, sparking conversation and smiles. It’s a delightful alternative to traditional Easter bunny desserts and truly captures the essence of spring with its vibrant colors and playful theme.
Gather Your Ingredients for the Cutest Easter Cupcakes
Crafting these adorable Bunny Butt Cupcakes requires a few key components. You can choose to make everything from scratch for the freshest taste, or take a few strategic shortcuts to save time without compromising on the fun and flavor. This recipe yields 24 cupcakes, perfect for a party!
For the Moist Chocolate Cupcake Base (Makes 24 cupcakes)
A rich, dark chocolate cupcake provides the perfect “dirt” for our bunny to burrow into. The combination of cocoa powder, buttermilk, and warm water ensures an incredibly moist and flavorful crumb.
- 1 1/2 cups all-purpose flour
- 1 1/2 cups granulated white sugar
- 3/4 cup unsweetened cocoa powder (Hershey’s is a great choice for rich flavor)
- 1 1/2 teaspoons baking soda
- 3/4 teaspoons baking powder
- 3/4 teaspoon Kosher salt
- 2 large eggs
- 3/4 cup buttermilk (for tenderness and moisture)
- 3/4 cup warm water (enhances cocoa flavor)
- 1/4 cup canola oil (adds moisture without heaviness)
- 1 teaspoon pure vanilla extract (for depth of flavor)
Shortcut Tip: If you’re pressed for time, a good quality chocolate cupcake box mix can be a fantastic substitute. Just make sure it yields 24 cupcakes or adjust quantities accordingly.
For the Velvety Green Buttercream Frosting
This luscious buttercream will be the vibrant “grass” for our bunnies. Its creamy texture and bright green hue are essential for the overall look.
- 3 cups powdered sugar (confectioners’ sugar)
- 1/3 cup unsalted butter, softened to room temperature (crucial for smooth frosting)
- 1 1/2 teaspoons pure vanilla extract
- 1-2 tablespoons whole milk (adjust for desired consistency)
- Green gel food coloring (gel works best for intense, consistent color)
Shortcut Tip: To simplify, use store-bought vanilla frosting and tint it green with gel food coloring. Ensure it’s thick enough to hold its shape.
For the Adorable Bunny Decorations
These are the delightful components that bring our bunny butts to life!
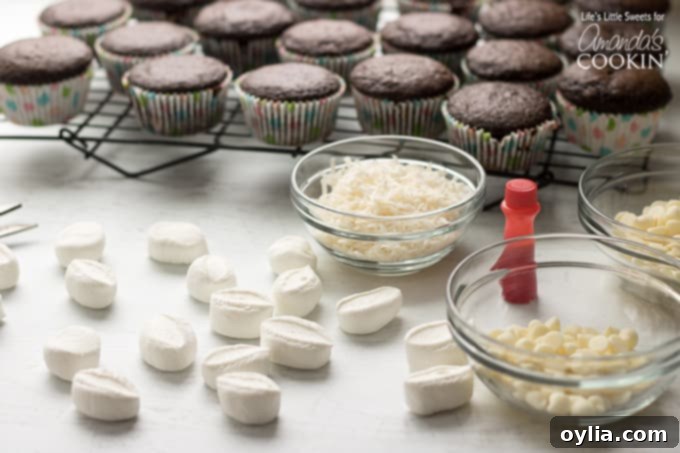
- 12 regular-sized marshmallows, cut in half (this yields 24 halves for the bunny bodies)
- 24 mini marshmallows (for the fluffy tails)
- 1 cup white chocolate (for forming the feet and dipping the bunny bodies)
- 1/4 cup white chocolate morsels (for making the pink toes)
- Red gel food coloring (just a drop or two for the perfect pink toes)
- 1/2 cup coconut flakes (for the bunny’s fluffy fur)
Essential Kitchen Tools for Bunny Butt Cupcakes
Having the right tools can make your baking and decorating process smooth and enjoyable. Here’s what you’ll need:
- Cupcake tin: For baking your delicious chocolate cupcakes.
- Measuring spoons and cups: Essential for accurate ingredient measurements.
- Mixing bowls: A large one for the cupcake batter and a medium one for frosting.
- Baking spatula: For scraping bowls and mixing.
- Offset spatula: Ideal for spreading frosting smoothly or creating a textured “grass” look.
- Handheld electric mixer: For easily combining ingredients and whipping up fluffy buttercream.
- 24 cupcake liners: Plus extra, if you prefer to double line them for extra sturdiness or presentation.
- Wire cooling rack: To allow your cupcakes to cool completely before frosting.
- Parchment or wax paper: Crucial for neatly crafting the white chocolate bunny feet.
- Rimmed aluminum baking sheet: Provides a stable surface for the parchment paper when making the feet.
- Kitchen scissors: For cleanly cutting marshmallows in half.
- Toothpicks: Indispensable for dipping marshmallows, handling the tiny components, and creating the delicate pink toes.
How to Make Bunny Butt Cupcakes: Step-by-Step Guide
Let’s dive into the fun part! Follow these detailed instructions to create your own batch of delightful Bunny Butt Cupcakes. We’ll start with the decorations, as they require chilling time.
Step 1: Crafting the White Chocolate Bunny Feet
The bunny feet are one of the most charming elements, so let’s get them prepared first! This step involves melting white chocolate and shaping it, then adding a touch of pink for the pads and toes.
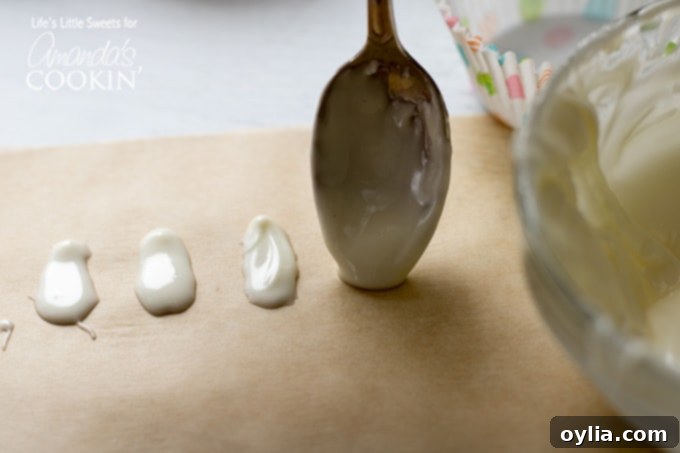
- Melt the White Chocolate: Place 1 cup of white chocolate in a microwave-safe bowl. Heat in the microwave at 30-second intervals, stirring thoroughly after each interval, until completely melted and smooth. Depending on your microwave, this usually takes about 1.5 to 2 minutes total (3-4 intervals).
- Form the Feet: Line a rimmed baking sheet with wax paper or parchment paper. Using a spoon, create 48 equally sized oval shapes on the paper. These will be the foundation of your bunny feet.
- Harden the Feet: Place the baking sheet with the chocolate ovals into the freezer for about 10 minutes, or until they are firm and hardened.
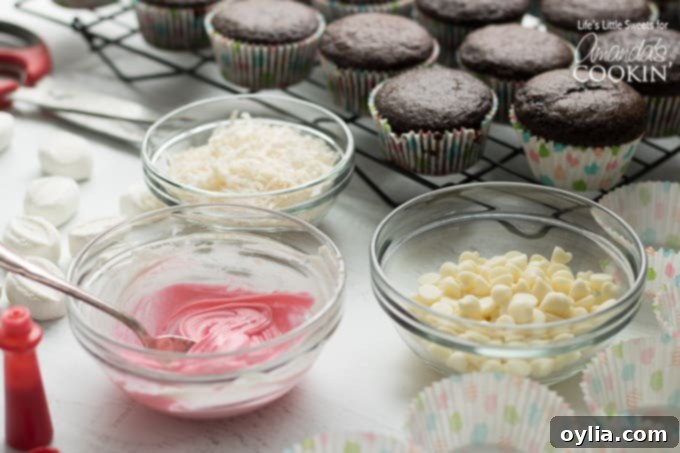
- Prepare Pink Chocolate for Toes: While the white chocolate feet are hardening, melt 1/4 cup of white chocolate morsels in the microwave using the same 30-second interval method. Once melted, add 1-2 drops of red gel food coloring and mix until you achieve a uniform pink color. This will be for the tiny toe pads.
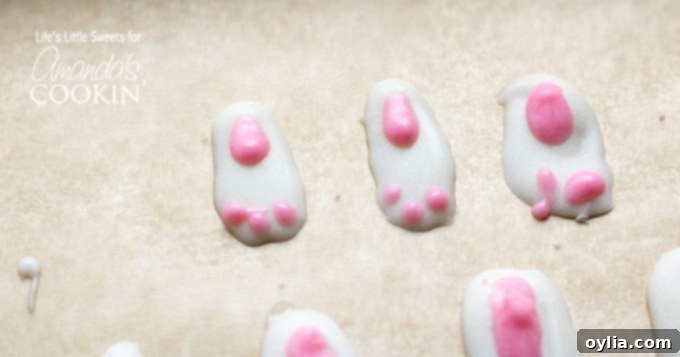
- Add Pink Details: Once the white chocolate feet are hardened, remove them from the freezer. Using a toothpick, carefully create small pink toes and pads on each white chocolate oval. Work quickly as the pink chocolate will harden faster on the cold white chocolate.
- Final Chill: Return the decorated feet to the freezer for another 5-10 minutes to fully set the pink details. They will be ready to use when you’re assembling the cupcakes. Remember, if your main white chocolate hardens while you’re busy, you can always reheat it briefly in the microwave.
Step 2: Preparing the Fluffy Chocolate Cupcakes
While your bunny feet are chilling, you can bake the delicious foundation for your cupcakes.
- Preheat Oven & Prepare Pan: Preheat your oven to 325 degrees F (160 degrees C). Line a 12-cup cupcake tin with paper liners. If you’re making 24 cupcakes, you’ll need to bake in batches or use two tins.
- Combine Dry Ingredients: In a large mixing bowl, whisk together the all-purpose flour, granulated white sugar, unsweetened cocoa powder, baking soda, baking powder, and Kosher salt until they are well combined.
- Add Wet Ingredients: Create a well in the center of the dry ingredients. Add the eggs, buttermilk, warm water, canola oil, and pure vanilla extract. Mix on low speed (or by hand) until all ingredients are just combined and the batter is smooth. Be careful not to overmix, as this can lead to tough cupcakes.
- Fill Liners & Bake: Using a large cookie scoop or spoon, fill each cupcake liner about two-thirds full with batter. Bake for 20-22 minutes, or until a toothpick inserted into the center of a cupcake comes out clean.
- Cool Completely: Remove the cupcakes from the tin and transfer them to a wire cooling rack to cool completely. This step is crucial; frosting warm cupcakes will result in a melty mess!
Step 3: Whipping Up the Green Buttercream “Grass”
Now for the vibrant green backdrop that makes our bunnies pop!
- Prepare the Buttercream: In a large mixing bowl, combine the softened unsalted butter, powdered sugar, pure vanilla extract, and 1 tablespoon of whole milk. Beat with an electric mixer on low speed until combined, then increase to medium-high and beat until light and fluffy. If the frosting is too thick, add the second tablespoon of milk, a little at a time, until it reaches a smooth, spreadable consistency.
- Tint Green: Add green gel food coloring, starting with 1-2 drops, and mix until you achieve your desired shade of vibrant green. Add more drops as needed, mixing after each addition, until the color is even throughout.
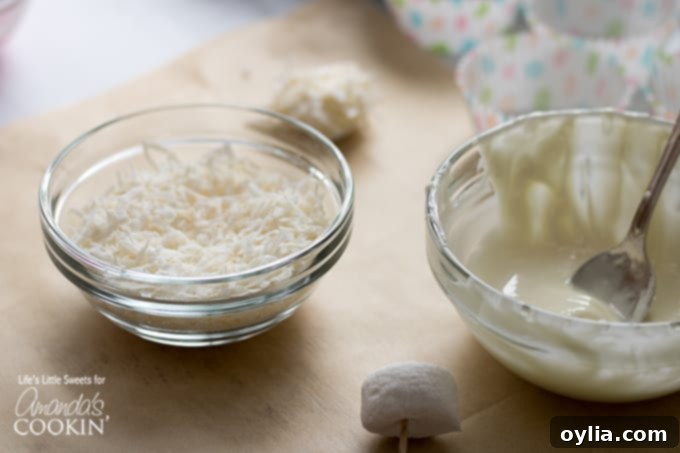
- Frost the Cupcakes: Once the chocolate cupcakes are completely cool, use an offset spatula to spread a generous layer of green buttercream on top of each cupcake. For a realistic “grass” texture, you can lightly tap the spatula on the surface of the frosting, or use a piping bag fitted with a grass tip.
Step 4: Assembling Your Bunny Butts
This is where the magic happens and your cupcakes transform into adorable bunny butts!
- Prepare Marshmallow Bodies: Using kitchen scissors, cut each regular-sized marshmallow in half. This will give you a flatter surface to place on the cupcake.
- Dip Marshmallow Bodies: Take a large marshmallow half (the bunny’s body) and insert a toothpick into the cut side. Dip the marshmallow into the melted white chocolate (reheat if necessary), ensuring it’s fully coated. Immediately transfer it to the bowl of coconut flakes and roll until completely covered.
- Place Bunny Body: Carefully remove the marshmallow from the toothpick and gently place it, coconut-flake side up, in the center of a green-frosted cupcake. This forms the main part of the bunny’s body.
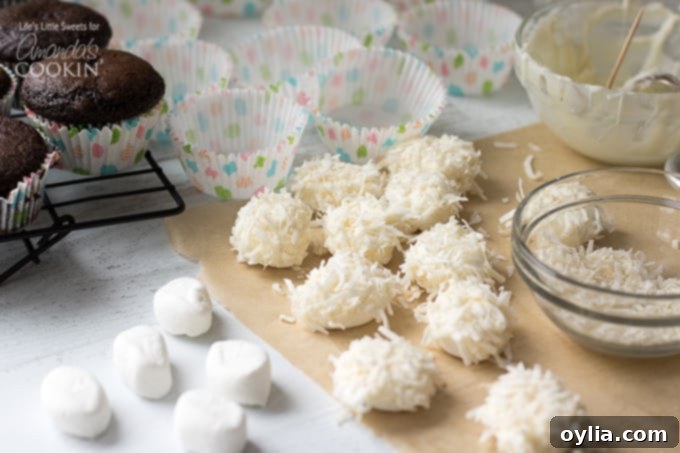
- Add Fluffy Tails: Take a mini marshmallow (the bunny’s tail). Dip one side into the melted white chocolate, then roll it in coconut flakes. Dip the other, un-flaked side of the mini marshmallow into the melted white chocolate again, and use this sticky side to attach it to the center of the large marshmallow half on the cupcake. This creates the illusion of a fluffy tail.

- Attach Bunny Feet: Retrieve your prepared white chocolate bunny feet from the freezer. Dip the plain (un-toed) side of each chocolate foot into the melted white chocolate and gently press two feet onto the front of the cupcake, positioning them so they appear to be peeking out from under the bunny’s body.
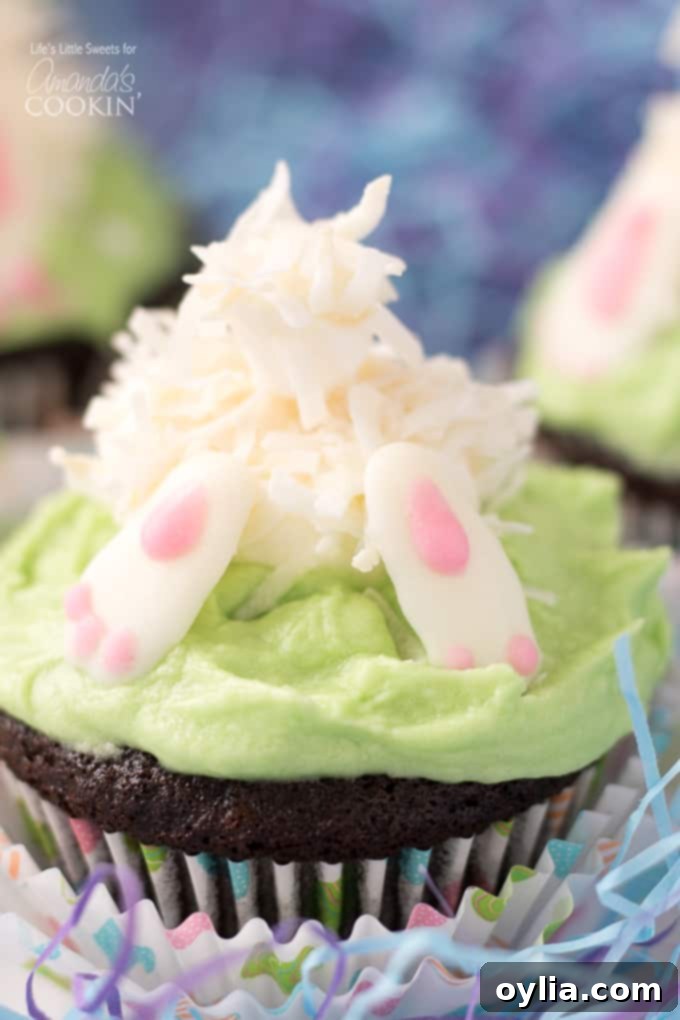
And there you have it! A charming batch of Bunny Butt Cupcakes ready to delight your guests. I am confident you will absolutely love making and sharing these!
Tips for Perfect Bunny Butt Cupcakes Every Time
Achieving bakery-quality (and cuteness-level) Bunny Butt Cupcakes is easier than you think with these expert tips:
- Room Temperature Ingredients: For the cupcakes and buttercream, ensure butter, eggs, and buttermilk are at room temperature. This allows them to emulsify properly, resulting in a smoother batter and fluffier frosting.
- Don’t Overmix: When making the chocolate cupcake batter, mix only until the ingredients are just combined. Overmixing develops gluten, leading to dense, tough cupcakes.
- Cool Cupcakes Completely: This cannot be stressed enough! If your cupcakes are even slightly warm when frosted, the buttercream will melt and slide right off. Patience is key.
- Achieving Grass Texture: An offset spatula can create a rustic “grass” look by gently tapping and pulling the frosting. For a more defined, realistic grass effect, use a piping bag fitted with a multi-opening grass tip (like Wilton #233).
- Chill Decorations: Ensure your white chocolate bunny feet are fully hardened in the freezer before decorating them with pink toes and before attaching them to the cupcakes. This prevents them from bending or breaking.
- Working with Melted Chocolate: If your melted white chocolate starts to harden during the dipping process, simply pop it back into the microwave for 10-15 seconds to soften it again. Stir well.
- Coconut Coverage: Gently press the marshmallows into the coconut flakes to ensure good coverage. This gives your bunny butts that wonderfully fluffy, “furry” appearance.
Variations & Customizations for Your Easter Cupcakes
While the classic chocolate and green combination is a winner, feel free to get creative and personalize your Bunny Butt Cupcakes!
- Cupcake Flavors: Not a chocolate fan? No problem! Use a vanilla cupcake base for a lighter flavor, or a carrot cake recipe for an extra Easter-themed touch.
- Frosting Colors: Instead of green, try pastel blue for a “sky” effect or pastel pink for a “blossom” field. You could even use white frosting with green sprinkles for a quick alternative.
- Bunny Details: For extra flair, consider using edible food markers to draw tiny whiskers or eyes on the white chocolate feet (if you’re feeling ambitious!). A tiny edible flower sprinkle next to the bunny butt could also add a sweet touch.
- Coconut Alternatives: If you’re not a fan of coconut, you can still achieve a fluffy texture by using shredded white candy melts or finely chopped white chocolate instead. Or, simply leave the marshmallows plain white.
- Gluten-Free Option: Use a gluten-free chocolate cupcake mix and ensure all other ingredients are certified gluten-free to accommodate dietary needs.
Serving and Storage Suggestions
These beautiful Bunny Butt Cupcakes are definitely best enjoyed fresh, but they can be prepared ahead of time and stored properly to maintain their deliciousness and adorable appearance.
- Serving: Present them on a beautiful platter or a tiered stand to showcase their charm. They make a fantastic addition to any dessert table or as individual treats for guests.
- Storage: Store the decorated cupcakes in an airtight container in the refrigerator for up to 3-4 days. The buttercream and chocolate decorations will hold up well.
- Make Ahead: You can bake the chocolate cupcakes a day in advance, let them cool completely, and store them in an airtight container at room temperature. The white chocolate feet can also be made several days ahead and stored in an airtight container in the freezer. Frost and assemble the cupcakes on the day of your event for the freshest results.
- Bring to Room Temperature: For the best flavor and texture, allow the refrigerated cupcakes to come to room temperature for about 15-20 minutes before serving.
Frequently Asked Questions (FAQ) About Bunny Butt Cupcakes
Here are some common questions you might have about making these delightful Easter treats:
- Q: Can I use store-bought frosting?
- A: Absolutely! If you’re looking for a shortcut, simply buy a tub of vanilla or white frosting and mix in green gel food coloring until you reach your desired shade.
- Q: What if I don’t like coconut?
- A: No problem! You can skip the coconut flakes entirely. The marshmallow bodies will still look cute, or you can try finely crushed white sprinkles or even crushed white candy wafers for a different texture.
- Q: Can I make these cupcakes gluten-free?
- A: Yes! Substitute the all-purpose flour in the chocolate cupcake recipe with a 1:1 gluten-free baking flour blend. Ensure all other ingredients are naturally gluten-free.
- Q: How long do Bunny Butt Cupcakes last?
- A: When stored in an airtight container in the refrigerator, these cupcakes will stay fresh for 3-4 days. The decorations will hold their shape during this time.
- Q: Can I use different colored frosting?
- A: Of course! Feel free to experiment with pastel pink, yellow, or blue frosting for a different spring garden look. You can also vary the shades of green for a more natural effect.
More Delicious Easter & Spring Dessert Ideas
If you’re still in the mood for more festive baking, be sure to explore some of our other fantastic Easter and Spring-themed recipes. From sweet and savory to fun and easy, there’s something for everyone:
- Easter Crack – A delightful and addictive saltine toffee made festive with Easter-themed sprinkles.
- Easter Muddy Buddies (Puppy Chow) – A fun, snackable, and highly addicting treat perfect for crowds.
- Rice Krispie Nests – An iconic Easter treat that’s incredibly easy to make and looks adorable.
- Carrot Cake Trifle – A stunning dessert that will truly “wow” your guests with its layers of moist carrot cake and creamy frosting.
- Checkerboard Easter Cake – Impress everyone with this beautiful pastel-colored checkerboard cake, a true showstopper.
- Frosted Sugar Cookie Bars – Easy-to-make sugar cookie bars topped with an assortment of pastel-colored icing.
- Easter Chick Cupcakes – Another adorable, easy-to-make Easter-themed cupcake recipe.
- Hot Cross Buns – Traditional sweet buns dotted with raisins and candied orange peels, finished with a classic icing cross.
- Easter Dirt Cake – A fun and festive dirt cake, complete with edible “soil” and candy decorations, perfect for your holiday spread.
- Bunny Butt Pancakes – Start your Easter morning with these soft and fluffy pancakes, artfully decorated with fruit and whipped cream.
- Bunny Rolls – A charming and simple addition to your Easter dinner table, shaped like cute little bunnies.
And for a fun activity that kids and adults alike will enjoy, don’t miss our stunning cracked colored eggs!
Bunny Butt Cupcakes
IMPORTANT – There are often Frequently Asked Questions within the blog post that you may find helpful. Simply scroll back up to read them!
Print It
Rate It
Save ItSaved!
Ingredients
Chocolate Cupcake Base:
- 1 ½ cups all-purpose flour
- 1 ½ cups granulated white sugar
- ¾ cup unsweetened cocoa powder I use Hershey’s
- 1 ½ teaspoons baking soda
- ¾ teaspoons baking powder
- ¾ teaspoon Kosher salt
- 2 large eggs
- ¾ cup buttermilk
- ¾ cup warm water
- ¼ cup canola oil
- 1 teaspoon pure vanilla extract
Green Buttercream Frosting:
- 3 cups powdered sugar
- ⅓ cups unsalted butter softened to room temperature
- 1 ½ teaspoons pure vanilla extract
- 1-2 tablespoons whole milk
- green gel food coloring
Decorations:
- 12 each marshmallows regular size, cut in half – so you will have 24 halves for the cupcakes
- 24 each mini marshmallows tail
- 1 cup white chocolate – to make the feet and to dip the marshmallows
- ¼ cup white chocolate morsels *melted to make the pink chocolate for the feet
- red gel food coloring – to make pink chocolate for the feet
- ½ cup coconut flakes
Before You Begin
You can use a box mix for the chocolate cupcake base; just make sure it makes 24 cupcakes.
You can use store bought buttercream frosting and green gel food coloring in place of making homemade buttercream frosting.
You can use white store bought fondant to shape the bunny’s feet in place of the white chocolate, if you prefer.
You can use pink store bought icing for detailing the bunny’s feet.
Instructions
-
Chocolate Cupcakes:
-
Preheat oven to 325 degrees F and line a cupcake tin with paper liners, set aside. You may need to bake in batches depending on the size of your cupcake tin.
-
In a large mixing bowl, mix flour, sugar, cocoa powder, baking soda, baking powder and Kosher salt until combined.
-
Add 2 eggs, buttermilk, water, canola oil, and vanilla extract, mix until combined. Scoop using a large cookie scoop into the cupcake liners (2/3 full). Bake for 20-22 minutes. You can test with a toothpick or knife in the center for doneness and it should come out clean. Remove cupcakes from tin and cool completely on a wire rack.
-
To make the bunny “feet”:
-
Melt the 1 cup white chocolate in the microwave at 30 second intervals, stirring in between until completely melted, for my microwave it takes 3, 30 second intervals.
-
On a piece of wax paper or parchment paper on a rimmed baking sheet, spoon 48, equally-sized ovals to represent the feet. Put in the freezer for 10 minutes to harden. Use the remaining white melted chocolate for dipping the marshmallows (see below). If you stop and do something else and the chocolate hardens, you can always reheat in the microwave to melt again.
-
To make the pink toes on the bunny feet, melt 1/4 cup white chocolate morsels in the microwave at 3, 30 second intervals, stirring in between. Add 1-2 drops red gel food coloring and mix until the color is even.
-
When the white chocolate feet are hard after freezing, take them out and using a toothpick, make the little toes and pads of the feet. When you are done, return them to the freezer to harden for 5-10 minutes. Take them out when you are ready to apply them.
-
For the Buttercream Frosting:
-
In a large mixing bowl, mix softened unsalted butter, confectioner’s sugar, vanilla and milk until smooth. Add in green gel food coloring drops until desired shade of green is achieved.
-
When cupcakes are cool, using an offset spatula, spread the frosting on the tops of the cupcakes and “tap” lightly to get a grass-like texture OR you can use a piping bag with a tip specifically to make the “grass.”
-
Dip the large marshmallow halves using a toothpick into the melted white chocolate and then into the coconut flakes and then place in the middle of the green frosted cupcakes, coconut flake side up.
-
Dip the mini marshmallows in the melted white chocolate and then in the coconut flakes. Turn them around and then dip the other side in the melted white chocolate and use that to stick them in the center of the large marshmallow half already on the top of the cupcake.
-
Place the prepared white chocolate “feet” of the bunnies by dipping the blank side in melted chocolate and place on front of the cupcake where the bunny’s feet would be.
-
Keep the cupcakes in an air tight container, in the refrigerator, until they are ready to serve. Enjoy!
Nutrition
The recipes on this blog are tested with a conventional gas oven and gas stovetop. It’s important to note that some ovens, especially as they age, can cook and bake inconsistently. Using an inexpensive oven thermometer can assure you that your oven is truly heating to the proper temperature. If you use a toaster oven or countertop oven, please keep in mind that they may not distribute heat the same as a conventional full sized oven and you may need to adjust your cooking/baking times. In the case of recipes made with a pressure cooker, air fryer, slow cooker, or other appliance, a link to the appliances we use is listed within each respective recipe. For baking recipes where measurements are given by weight, please note that results may not be the same if cups are used instead, and we can’t guarantee success with that method.
Recipe Attribution
The chocolate cupcake part of this recipe is inspired by these Chocolate Cupcakes from The Stay at Home Chef.
This post originally appeared here on Mar 25, 2018.
