Bake Irresistible Rustic Rosemary Garlic Bread in Your Food Processor: A Simple & Flavorful Recipe
There’s a special kind of satisfaction that comes from baking your own bread, and some recipes are simply too good to keep waiting. For months, I’d had this particular rustic rosemary garlic bread recipe tucked away, anticipating the perfect day to bring it to life. That day finally arrived, and I can confidently say, after pulling two gorgeous loaves from the oven, that this is one of the most delicious homemade breads I’ve ever tasted. What makes it even more remarkable is its preparation method: entirely made in the food processor. This approach offers a fantastic alternative to traditional mixer or hand-mixed doughs, streamlining the process without compromising on quality or flavor.
The combination of fresh garlic and fragrant rosemary infused into this crusty, rustic loaf is nothing short of marvelous. Each bite offers a burst of aromatic herbs and savory garlic, perfectly balanced with a tender interior. This recipe yields two generous loaves, making it ideal for sharing with friends and family, or simply enjoying one yourself and freezing the other for a rainy day. The aroma that fills your kitchen while it bakes is, in itself, a reason to try this recipe.
Why Choose the Food Processor for Bread Dough?
While many home bakers swear by stand mixers or the therapeutic process of hand-kneading, the food processor offers a distinct advantage: speed and efficiency. It significantly cuts down on kneading time, typically achieving a perfectly smooth and elastic dough in under a minute. For those with busy schedules or limited counter space, a food processor can be a game-changer, making homemade bread a much more accessible and less daunting task. It’s also excellent for integrating ingredients quickly and thoroughly, ensuring a consistent texture throughout your dough.
I originally discovered this delightful bread recipe on Katie’s wonderful blog, Good Life Eats. If you’re not already familiar with her work, I highly recommend checking out her site. Katie consistently shares truly marvelous recipes, and her food photography is absolutely stunning – inspiring enough to make your mouth water! Her original recipe served as a fantastic foundation, and I’m thrilled to share my slightly adapted version with you.
Katie’s recipe suggested using a 12-cup food processor. My own food processor is a bit smaller, a 10-cup model, which meant I had to process the dough in two batches. This was a minor adjustment and didn’t complicate the process much. I’m already accustomed to making my pizza dough in the food processor, so while this was my first time tackling a full bread loaf this way, I was quite familiar with using the appliance for a bread-type dough.
My Simple Adjustments to the Original Recipe
I generally followed Katie’s brilliant recipe closely, making only a few minor tweaks to suit my available ingredients and equipment. These small changes didn’t alter the essence of the bread but adapted it slightly for my kitchen:
- Instead of a standard envelope of yeast, I opted for SAF instant yeast, which is incredibly reliable and often doesn’t require proofing.
- My rosemary supply was a bit limited, so my measurement was closer to a generous 1/4 cup rather than the original call. The flavor was still wonderfully prominent.
- For the whole wheat flour component, I used some fantastic home-ground wheat flour generously provided by my neighbor. This added an even more authentic, rustic touch to the loaves.
- As mentioned, due to the 10-cup capacity of my food processor, I divided the ingredients and processed the dough in two separate batches.
The Perfect Loaf: Crust, Crumb, and Unforgettable Aroma
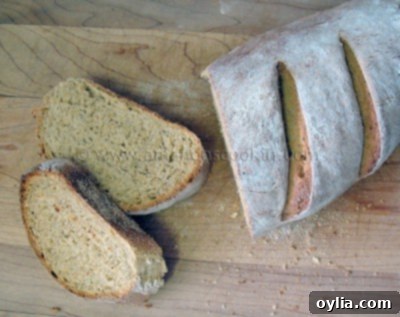
This rustic rosemary garlic bread truly delivers on all fronts. It boasts a beautifully crisp, rustic crust that crackles slightly with each slice, giving way to a tender, flavorful crumb. The interior is soft and airy, studded with finely minced garlic and fragrant rosemary, making it a delight for the senses. It’s absolutely perfect served warm, with just a smear of butter melting into its delicious crevices. But don’t stop there! This bread transforms into an amazing toast the next morning, carrying its wonderful flavors through to breakfast.
Sliced thinner, this versatile bread also makes an excellent foundation for sandwiches, adding a gourmet touch to your everyday lunch. I kept one freshly baked loaf for my family to enjoy and happily shared the other with a friend, who was equally impressed. I can assure you, this recipe will be making regular appearances in my kitchen, if for no other reason than to fill my home with its absolutely fabulous, inviting aroma!
Tips for Baking Flawless Food Processor Bread
Even with the convenience of a food processor, a few tips can help ensure your rustic rosemary garlic bread turns out perfectly every time:
- Yeast Activation: Always ensure your warm water is around 105-115°F (40-46°C) to properly activate the yeast. Too hot, and you’ll kill it; too cold, and it won’t activate.
- Dough Consistency: The food processor makes quick work of kneading, but watch for the dough to form a ball and become smooth and elastic. It should be slightly sticky, but not so wet that it adheres excessively to the bowl. Adjust flour by the tablespoon if needed.
- Rising Environment: A warm, draft-free spot is ideal for rising dough. If your kitchen is cool, try placing the bowl in a slightly warmed (but turned off) oven or near a sunny window.
- Oven Temperature: The initial high temperature helps create that signature crust, while lowering it ensures the interior bakes through without burning the outside. An oven thermometer is a baker’s best friend for accurate temperatures.
- Scoring the Loaves: Those diagonal slashes aren’t just for aesthetics! They allow the bread to expand properly in the oven, preventing uncontrolled cracking and promoting an even rise.
- Don’t Skimp on Cooling: While it’s tempting to dive right into a warm loaf, letting the bread cool on a rack allows the internal structure to set and the flavors to fully develop.
Creative Serving Ideas for Your Rosemary Garlic Bread
While delicious on its own or with butter, this versatile bread can elevate many meals:
- Soup Companion: Serve thick slices alongside a hearty minestrone, French onion soup, or a creamy tomato bisque.
- Bruschetta Base: Toast thin slices, rub with a fresh garlic clove, drizzle with olive oil, and top with diced tomatoes, basil, and a sprinkle of balsamic glaze.
- Dipping Delight: Cut into cubes and serve with a good quality olive oil mixed with a pinch of red pepper flakes and Parmesan cheese.
- Sandwich Upgrade: Use it for elevated deli sandwiches, gourmet grilled cheese, or even as a base for open-faced melts.
- Croutons: Stale bread makes fantastic homemade croutons for salads or soups. Simply cube, toss with olive oil, and bake until golden and crisp.
If you love unique bread recipes, you might also enjoy my scallion chive bread!
Rustic Rosemary Garlic Bread
slightly adapted from Good Life Eats

Rustic Rosemary Garlic Bread
IMPORTANT – There are often Frequently Asked Questions within the blog post that you may find helpful. Simply scroll back up to read them!
Print It
Pin It
Rate It
Save ItSaved!
Ingredients
- 2 cups warm tap water about 110 degrees
- ¼ cup olive oil
- 2 ½ teaspoons active dry yeast 1 envelope
- 3 cups all-purpose flour
- 2 ½ cups whole wheat flour
- 6 cloves garlic minced
- ⅓ cup fresh rosemary chopped
- 4 teaspoons salt
- ¼ cup flour for dusting the loaves
- Cornmeal for the pans
- 2 small cookie sheets or a large at least 11×17-inch jelly roll pan
Instructions
-
To make the dough, in a small bowl or 2 cup measuring cup place water and sprinkle yeast on surface, allowing it to stand for three minutes before whisking. After dissolved, whisk in the olive oil.
-
To mix dough in a full-sized food processor, place 2 3/4 cup all-purpose flour and 2 1/2 cups whole wheat flour, garlic, rosemary, and salt in bowl of the food processor fitted with a dough blade.
-
Add water, oil, and yeast mixture and process to form a smooth, elastic and slightly sticky dough, about 45 seconds. Incorporate the remaining 1/4 cup all-purpose flour a tablespoon at time if the dough is too soft.
-
Place dough in an oiled bowl and turn dough over so top is oiled. Cover bowl with plastic wrap and allow dough to rise at room temperature until doubled.
-
To shape loaves, scrape risen dough onto a lightly floured surface and press it to deflate it. Divide dough in half and shape one piece at a time. Press dough into a square, then roll it up tightly. Rotate cylinder of dough 90 degrees and roll up again from short end. Arrange dough seam side down, cover with plastic or a towel and let it rest of 5 minutes. Repeat with remaining piece of dough.
-
Dust pan with cornmeal. Roll each piece of dough under palms of your hands to elongate it. Work from middle of loaf outward, pointing the ends slightly. Place loaves seam side down on cookie sheets and dust each loaf heavily with flour, using about 1/4 cup in all. Cover with plastic or a towel and allow to rise until doubled.
-
About 30 minutes before you intend to bake the loaves, preheat oven to 500 degrees F and set racks at the middle and lowest levels. Set a pan on the lowest rack to absorb some of the excess bottom heat and keep the bottom of the loaves from burning.
-
Holding a razor blade or the point of a very sharp knife at a 30-degree angle to the top of each loaf, make 3 to 4 diagonal slashes in each loaf. Immediately place loaves in oven and lower temperature 450 degrees F. After loaves have baked for 20 minutes and are completely risen, lower temperature to 350 degrees F and continue baking about 20 to 30 minutes longer, until bread reaches an internal temperature of about 210-220 degrees F. Remove loaves from oven and cool on a rack.
-
Makes 2 loaves
Nutrition
The recipes on this blog are tested with a conventional gas oven and gas stovetop. It’s important to note that some ovens, especially as they age, can cook and bake inconsistently. Using an inexpensive oven thermometer can assure you that your oven is truly heating to the proper temperature. If you use a toaster oven or countertop oven, please keep in mind that they may not distribute heat the same as a conventional full sized oven and you may need to adjust your cooking/baking times. In the case of recipes made with a pressure cooker, air fryer, slow cooker, or other appliance, a link to the appliances we use is listed within each respective recipe. For baking recipes where measurements are given by weight, please note that results may not be the same if cups are used instead, and we can’t guarantee success with that method.

Did you enjoy this post? Why not subscribe to my feed, or better yet, to my free newsletter – Foodie in the Craftroom, which provides not only recipes but crafts from my other blog, Crafts by Amanda too!
NEW! Be sure to subscribe to my newsletter, Foodie in the Craftroom, to receive updates and tips from both Amanda’s Cookin’ and Crafts by Amanda! Visit https://amandascookin.com/p/subscribe-to-newsletter.html
