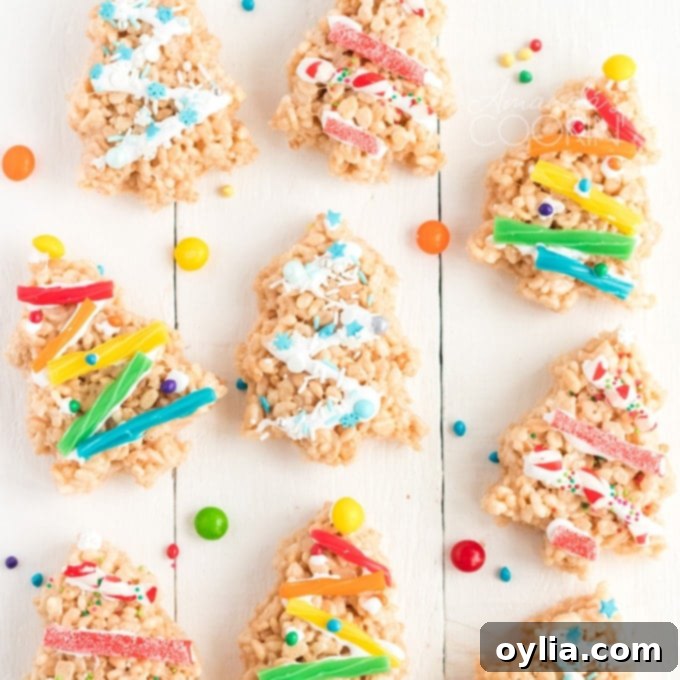
Festive Christmas Tree Rice Krispie Treats: An Easy & Fun Holiday Dessert for All Ages
Get ready to sprinkle some holiday magic with these absolutely adorable Christmas Tree Rice Krispie Treats! Ideal for a cozy, snowy afternoon or a festive family gathering, making these delightful treats with the kids is a wonderfully fun way to create lasting memories and delicious edible decorations. Everyone, from the youngest helpers to the most seasoned dessert connoisseurs, loves a classic Rice Krispie treat. Transforming them into charming little Christmas trees makes them an absolute must-have for the holiday season.
These treats are not just simple to make; they’re also incredibly versatile, allowing for endless creative decoration. Imagine a platter full of these cheerful, brightly adorned trees, ready to bring smiles to any Christmas party. You can easily whip up a batch of these alongside my Strawberry Christmas Trees for an impressive and varied holiday dessert spread that will be the talk of the town!

Why These Christmas Tree Rice Krispie Treats Are a Holiday Favorite
Rice Krispie treats hold a special place in the hearts of both children and adults. They are famously easy to prepare, require no baking, and offer a delightful crispy-chewy texture. The beauty of this recipe lies in its simplicity and the joy of transforming a classic snack into festive little decorated Christmas trees. Imagine the delight on children’s faces as they help press the mixture, cut out tree shapes, and then unleash their creativity with various candies to decorate their masterpieces. These treats aren’t just dessert; they’re an experience, a craft project, and a delicious memory all rolled into one. Perfect for holiday parties, school events, or just a cozy family night in.
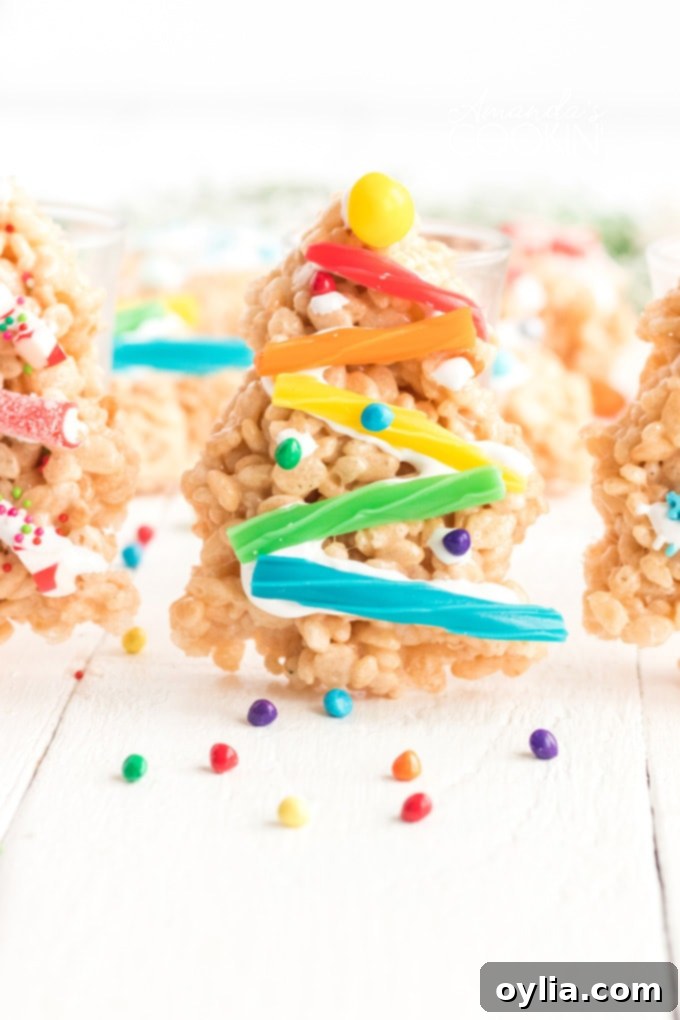
Simple Ingredients for Magical Christmas Tree Treats
Crafting these festive treats requires only a handful of common pantry staples. The magic happens when these simple ingredients come together to form a perfectly chewy and crispy base, ready for your artistic touch. Here’s what you’ll need to gather:
- 3 tablespoons butter: Unsalted butter is typically preferred for baking, but salted will work too. It adds a rich flavor and helps prevent sticking. For an extra layer of flavor, consider browning the butter slightly before adding marshmallows for a nutty undertone.
- 10 oz marshmallows or 4 cups miniature marshmallows: Fresh marshmallows are key for the best texture. If your marshmallows are a bit stale, they might not melt as smoothly. Mini marshmallows tend to melt faster and more evenly, but the larger ones work just as well.
- 6 cups Rice Krispies cereal: The star of the show! Ensure your cereal is fresh and crispy for that signature crunch. Generic crisp rice cereal also works perfectly.
- 1 cup marshmallow cream: This is a wonderful addition that makes the treats extra gooey and helps bind the decorations. It acts like an edible glue for your candies.
- Various candies for decorations: This is where the fun truly begins! Think colorful sprinkles, mini M&Ms, crushed candy canes, small pretzel sticks for tree trunks, licorice twists (cut into pieces), gumdrops, chocolate chips, or even edible glitter. Let your imagination run wild!
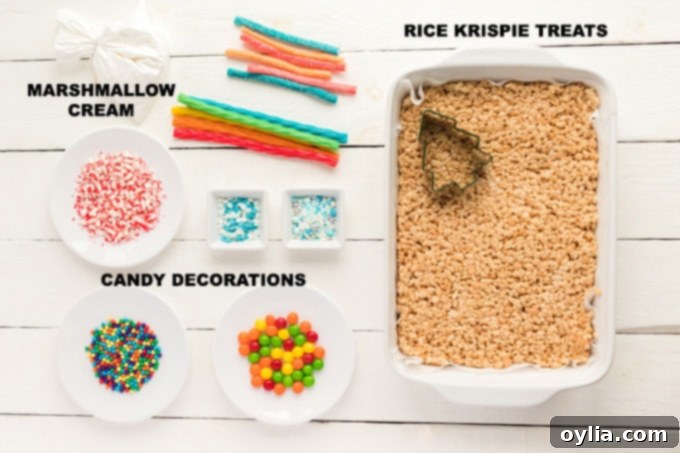
Helpful kitchen tools for success:
Having the right tools can make the process even smoother and more enjoyable, especially when little hands are helping out!
- Mixing bowls: A large, sturdy mixing bowl is essential for combining the melted marshmallow mixture with the cereal. Having a few smaller bowls on hand for different candy decorations is also useful.
- Christmas tree cookie cutters: These are crucial for shaping your treats! A set with various sizes can add visual interest to your platter. Ensure they are sturdy enough to press through the slightly sticky mixture.
- Rubber spatula: A heat-resistant rubber spatula is indispensable for stirring the marshmallows and folding in the Rice Krispies. Its flexibility helps scrape every last bit from the pan and ensures even coating.
- Piping bag: This is used for neatly applying the marshmallow cream for decorating. If you don’t have a dedicated piping bag, a sturdy plastic zipper-top sandwich bag with a small corner snipped off works perfectly as a makeshift alternative.
12 DAYS OF CHRISTMAS COOKIES
12 Christmas cookies you will love, PLUS bonus baking tips and TWO extra recipes you will not find on this blog! See ALL my cookbooks here!
Get the Christmas cookies cookbook! ONLY $9.97!!
Kitchen Tips for Perfect Rice Krispie Treats
Achieving perfectly chewy and delicious Rice Krispie treats is simple, but a few key tips can elevate your results:
- Melting marshmallows: While the stovetop method (over low heat) is recommended for better control, a microwave can also be used for convenience. If you prefer to use the microwave to melt the butter and marshmallow mixture, heat them on HIGH for 3 minutes, making sure to stir thoroughly after 2 minutes. Continue stirring until the mixture is completely smooth and lump-free. Be careful not to overheat, as this can make the treats hard.
- Yield variations: From our batch, we ended up with 9 beautifully shaped Christmas tree treats. However, the exact number of treats you yield can vary. This largely depends on the size of your chosen Christmas tree cookie cutter and how closely you place your cuts. To maximize your yield, try to cut shapes as close together as possible.
- Alternative shaping: If you don’t have a cookie cutter or prefer a more rustic look, you can skip the cookie cutter entirely! Simply cut the cooled Rice Krispie treat slab into long triangles using a buttered knife. This method is equally charming and still captures the Christmas tree essence.
- Preventing stickiness: When pressing the mixture into the pan or handling the cut-out shapes, butter your spatula, hands, or use wax paper. This prevents the sticky marshmallow mixture from adhering to everything and makes the process much cleaner.
- Even pressing: Ensure the mixture is pressed evenly into the pan. This helps achieve a consistent texture and thickness across all your treats, making them easier to cut and decorate.
How to Make Christmas Tree Rice Krispie Treats: Step-by-Step Guide
Follow these simple instructions to create your festive Christmas Tree Rice Krispie Treats. It’s a fun project that yields delightful results!
- Melt the butter: In a large, heavy-bottomed saucepan, melt the 3 tablespoons of butter over very low heat. Low heat is crucial here to prevent the butter from burning and the marshmallows from scorching.
- Add marshmallows: Once the butter is melted, add the 10 ounces of marshmallows (or 4 cups miniature marshmallows) to the saucepan. Continue to stir constantly over low heat until the marshmallows are completely melted and form a smooth, gooey liquid. Remove the pan from the heat immediately.
- Combine with cereal: Quickly add the 6 cups of Rice Krispies cereal to the melted marshmallow mixture. Using your buttered spatula, stir vigorously until the cereal is thoroughly coated with the marshmallow. Work quickly, as the mixture will start to set as it cools.
- Press into pan: Prepare a 13×9 inch baking pan by coating it generously with cooking spray or lining it with parchment paper for easy removal. Evenly press the sticky cereal mixture into the prepared pan. To prevent sticking, use a buttered spatula or a piece of wax paper to help press the mixture down firmly and evenly. Allow the treats to cool completely at room temperature; this usually takes about 30-60 minutes.
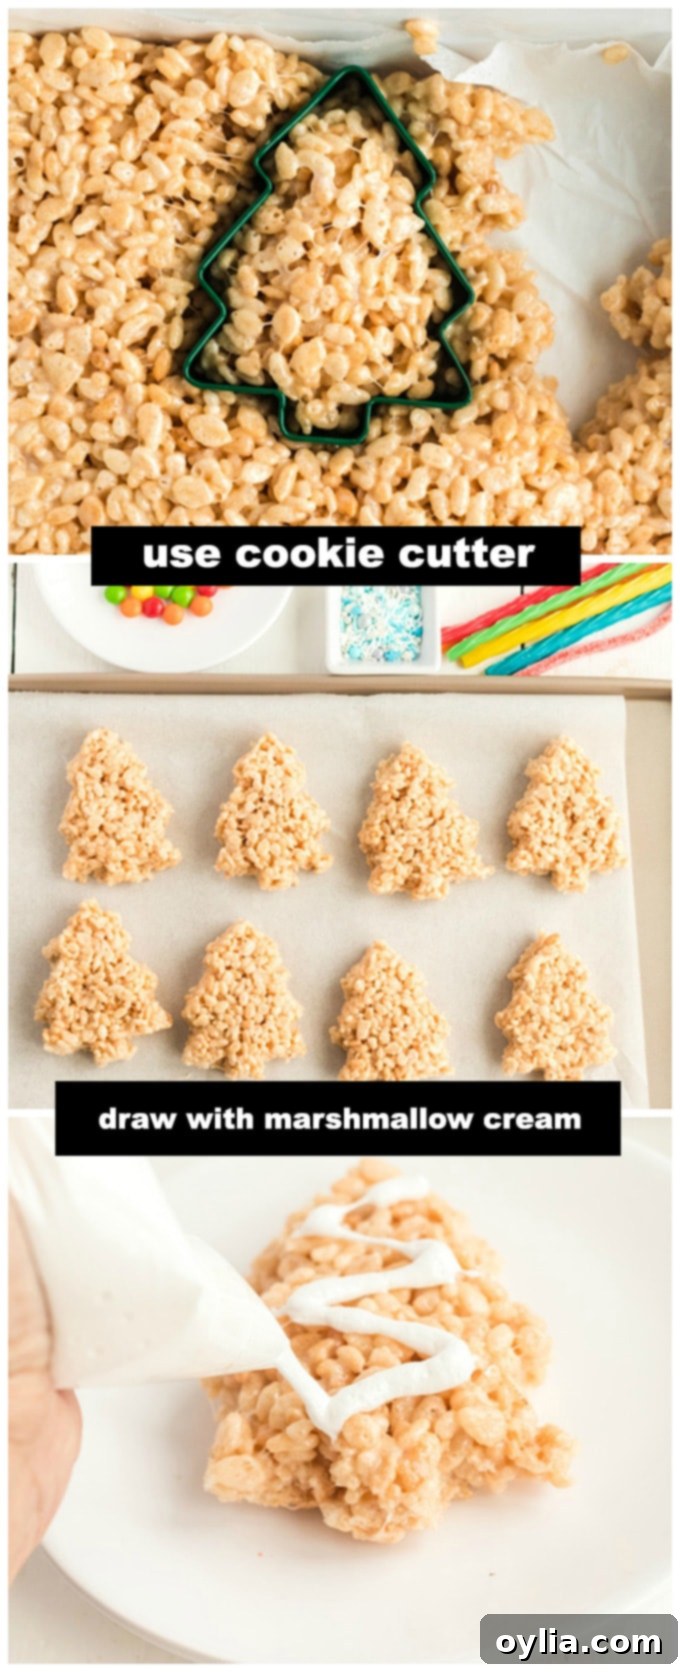
- Cut out tree shapes: Once the treats have cooled and set, use a Christmas tree shaped cookie cutter to carefully cut out as many tree shapes as you can from the slab. For easier cutting and to prevent the treats from sticking to the cutter, you can lightly butter the edges of the cookie cutter. Gather any leftover scraps and press them together to form additional treats, or simply enjoy them as a chef’s snack!
- Prepare for decorating: Take your 1 cup of marshmallow cream and transfer it into a piping bag. If you don’t have a piping bag, a plastic zipper sandwich bag with a small tip snipped off one corner will work just fine. This marshmallow cream will act as the “garland” and the adhesive for your candy decorations.
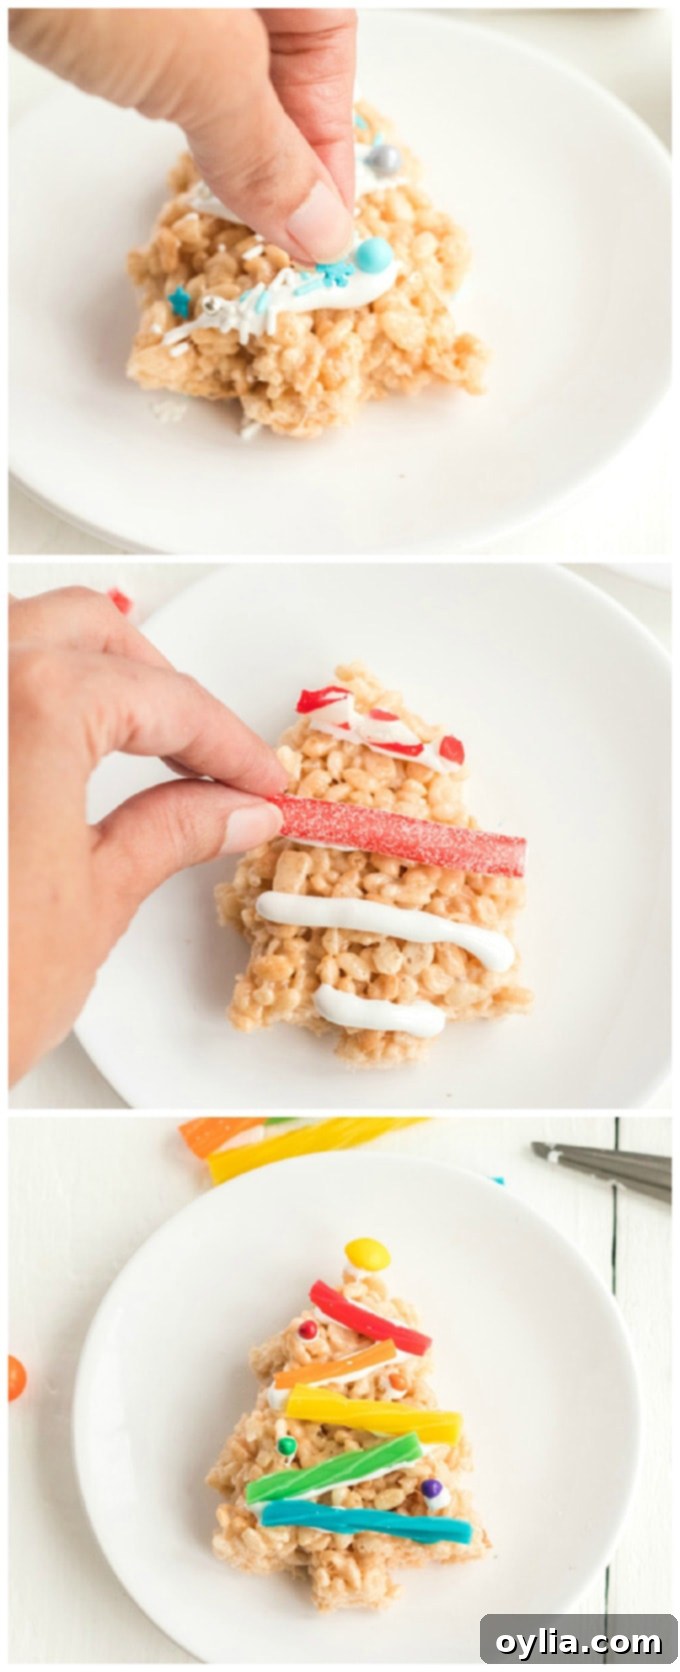
- Decorate your trees: Using the piping bag, pipe diagonal lines of marshmallow cream across each Rice Krispie tree, creating the look of festive garland. While the marshmallow cream is still sticky, add your chosen candy decorations onto these lines. This is the perfect opportunity for kids to get creative and personalize each tree! Consider adding a small star-shaped candy at the top for an extra touch of charm.
These Christmas Tree Rice Krispie Treats are not only incredibly fun for the kids to make but also serve as a delightful and edible centerpiece for your holiday celebrations. They’re a fantastic way to engage little ones in the kitchen without the need for an oven, making them a safe and enjoyable activity for the whole family. The joy of creating and then devouring these festive treats is truly priceless!

Storage and Serving Suggestions
Once decorated, these festive treats are best enjoyed fresh. Store them in an airtight container at room temperature for up to 3 days to maintain their chewiness. Avoid refrigerating, as it can make them hard. They are perfect for holiday dessert platters, as party favors, or simply as a sweet snack to enjoy during movie night with the family. Consider wrapping individual treats in clear cellophane bags with a festive ribbon for a charming homemade gift!
More Kid-Friendly Christmas Treat Ideas!
If you’re looking for more delightful holiday treats to make with your family, explore these other fantastic recipes. Each one is designed for fun and flavor, perfect for expanding your festive dessert menu:
- Christmas Tree Brownies: Rich, fudgy brownies cut into tree shapes and decorated with green frosting and candy ornaments. A classic festive favorite that’s always a crowd-pleaser.
- Chocolate Chip M&M Cookies: A colorful twist on the classic chocolate chip cookie, featuring festive red and green M&Ms that burst with holiday cheer in every bite.
- Gingerbread Cookies: The quintessential Christmas cookie! These aromatic, spiced cookies are perfect for cutting into gingerbread men or other holiday shapes and decorating with icing.
- Sugar Cookies: A versatile canvas for holiday creativity. Cut them into any shape imaginable and decorate with royal icing, sprinkles, and edible glitter for a truly personalized treat.
- Saltine Toffee: An incredibly easy and addictive no-bake treat that combines the salty crunch of saltine crackers with a rich, buttery toffee layer and a chocolate topping.
- Popcorn Chocolate Bark: A quick and customizable treat, this bark features crunchy popcorn embedded in a layer of delicious chocolate, perfect for adding your favorite holiday toppings.
- Festive Grilled Cheese: While not a dessert, this fun twist on grilled cheese with holiday-themed cookie cutter shapes is perfect for a festive lunch during the busy holiday season.
- Peppermint Candy Bark: A classic holiday treat with layers of white and dark chocolate infused with refreshing peppermint, topped with crushed candy canes.
- Rice Krispie Treat Gingerbread Men: Just like these Christmas trees, these gingerbread men are a fun, no-bake alternative using Rice Krispie treats, perfect for decorating with icing and candies.
Christmas Tree Rice Krispie Treats
IMPORTANT – There are often Frequently Asked Questions within the blog post that you may find helpful. Simply scroll back up to read them!
Print It
Rate It
Save ItSaved!
Ingredients
- 3 tablespoons butter
- 10 oz marshmallows or 4 cups miniature marshmallows
- 6 cups Rice Krispies cereal
- 1 cup marshmallow cream
- Various candies for decorations licorice twists, broken candy canes, M&Ms, etc
Things You’ll Need
-
Mixing bowls
-
Christmas tree cookie cutter
-
Rubber spatula
-
Piping bag
Before You Begin
- If you prefer to use the microwave to melt the marshmallow mixture, heat butter and marshmallows on HIGH for 3 minutes, stirring after 2 minutes. Stir until smooth.
- We ended up with 9 Christmas tree treats from our batch. However, depending on the size of your cookie cutter, the number of treats you end up with could vary.
- You could skip the cookie cutter all together and simply cut the treats into long triangles.
- Nutritional info does not include candy decorations.
Instructions
-
In large saucepan melt butter over low heat. Add marshmallows and stir until completely melted. Remove from heat.
-
Add Rice Krispies cereal. Stir until well coated.
-
Using buttered spatula or wax paper evenly press mixture into 13×9 pan coated with cooking spray. Cool.
-
Use a Christmas tree shaped cookie cutter to get as many trees from the rice krispie treats as you can.
-
Fill a piping bag or plastic zipper sandwich bag with marshmallow cream. Pipe onto the trees to create diagonal lines.
-
Add candy decorations to the diagonal lines.
Nutrition
The recipes on this blog are tested with a conventional gas oven and gas stovetop. It’s important to note that some ovens, especially as they age, can cook and bake inconsistently. Using an inexpensive oven thermometer can assure you that your oven is truly heating to the proper temperature. If you use a toaster oven or countertop oven, please keep in mind that they may not distribute heat the same as a conventional full sized oven and you may need to adjust your cooking/baking times. In the case of recipes made with a pressure cooker, air fryer, slow cooker, or other appliance, a link to the appliances we use is listed within each respective recipe. For baking recipes where measurements are given by weight, please note that results may not be the same if cups are used instead, and we can’t guarantee success with that method.
